Image to 3D is the beginning of a game asset, not the finish
An image to 3D workflow can turn a visual reference into a mesh you can rotate and edit. Turning that mesh into a convincing game prop is a separate job. The silhouette must remain readable, the materials must survive export, and the asset must behave correctly inside the scene where players encounter it. A beautiful studio preview does not establish any of those things by itself.
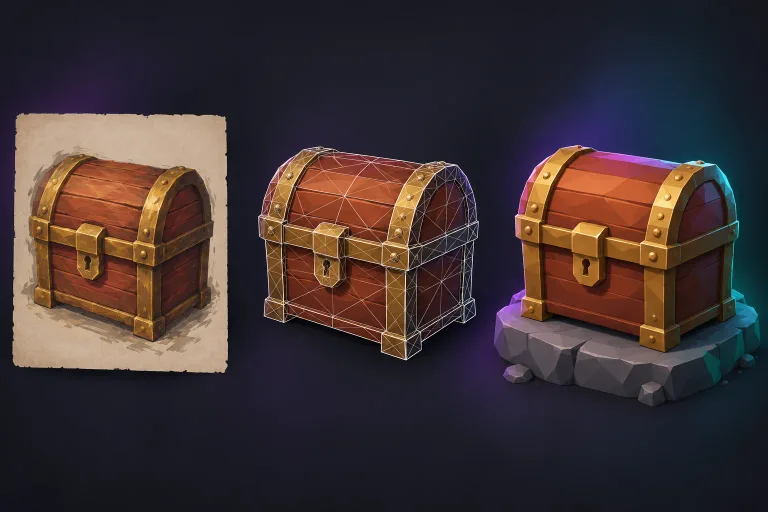
This guide follows one practical example: an original wooden treasure chest for a small adventure-game environment. It is a static background prop with a closed lid, broad metal bands, and one large latch. We will define its purpose, prepare a reference, inspect the generated geometry, simplify where appropriate, and test an exported GLB in Godot. The chest is a teaching scenario, not a published benchmark or a promise about the result of any particular generation.
The same decisions apply to crates, planters, signs, furniture, and other compact 3D game assets. Start with a single prop before attempting an entire environment. A small, repeatable exercise makes it easier to identify whether a problem comes from the reference, the mesh, the material setup, or the receiving application.
1. Write an asset brief before choosing a generator
Decide what the player actually needs to see. In our example, the chest sits beside a wall and is usually viewed from several steps away. It does not open, deform, or display an interior. Its important features are the curved lid, the contrast between wood and metal, and a latch large enough to read at gameplay distance. Tiny carved lettering would add work without helping that purpose.
Write those constraints down: static prop, closed lid, intended physical size, expected camera distance, target device, and material style. Also decide whether collision is needed. A chest that blocks a corridor has a different implementation requirement from a distant decorative object. None of these decisions can be inferred reliably from the words “game ready.”
Avoid choosing a universal polygon budget before understanding the scene. One chest in a quiet room and hundreds of chests in a crowded level create different demands. Establish a provisional budget with your project team or a representative scene, then revise it using actual measurements. Record triangle count, texture dimensions, material slots, and file size separately rather than treating them as interchangeable measures of quality.
2. Prepare a reference that explains the chest's structure
Use a clear three-quarter view that shows the front, one side, and the lid. Keep the whole chest inside the frame with a small margin. A simple contrasting background makes its outline easier to judge. Choose soft lighting so a cast shadow does not resemble a missing panel or an extra supporting foot.
For this reference, use substantial bands and one recognizable latch instead of chains, dangling keys, or thin decorations. Separate the metal from the wood through shape and color, not only through a dramatic reflection. If two decorative parts overlap in the picture, consider whether the generator could interpret them as one fused surface.
A single picture still does not document the back, underside, hinge construction, or internal volume. Decide which hidden details can be approximate and which require manual modeling. Keep the original reference unchanged and make preparation edits on a copy. If you later compare two generations, use the same reference and change one setting at a time so that the comparison tells you something useful.
3. Choose image to 3D or text to 3D for the right reason
Use image to 3D when you already have a visual design worth preserving. The reference communicates the lid's proportions, the position of the bands, and the relationship between the latch and the front panel. Use text to 3D when those decisions are still open and you want to explore an idea before committing to a drawing.
An AI 3D model generator does not remove uncertainty in either case. A text prompt may leave important construction details unspecified; an image may hide them. Choose the input that best expresses your brief rather than assuming one mode guarantees cleaner topology. In both workflows, judge the complete model instead of the first flattering preview angle.
In Modzi3D, review the studio's current availability and the displayed Base or Pro settings before submitting. An eligible three-day trial has a limited image-generation allowance and requires a card; subscription credits begin after successful payment. Check current pricing and cancellation terms before starting. Selecting a reference is not the same action as submitting a generation request.
4. Inspect the generated mesh before simplifying anything
Rotate the chest through a full turn and inspect it from above and below. Look for a swollen rear panel, a latch fused into the lid, disconnected fragments, or a base that is not actually flat. Check whether an apparent gap is geometry, a dark texture patch, or simply a shadow in the preview.
Decide whether the result is suitable for the brief before spending time optimizing it. A minor bump on the underside of a background prop may be acceptable. A distorted curved lid that changes the silhouette is a more serious problem. Repeatedly reducing polygons will not correct a fundamentally wrong shape, and another generation is not always the most efficient repair.
Save the original output and create a working copy for edits. Use descriptive filenames such as chest_source, chest_cleanup, and chest_engine_test. Keep a short note containing the reference, generation settings, observed problem, and the next change you intend to make. This is more useful than accumulating files named final, final2, and final-really-finished.
5. Separate a low-poly look from a low-cost asset
A low poly 3D model can describe an artistic style, a reduced geometry budget, or both. Broad faceted surfaces may look deliberately simple while the underlying mesh still contains unnecessary internal faces. Conversely, a visually smooth object can have a modest geometry count. Inspect the actual asset rather than using its appearance as a performance measurement.
For our chest, preserve the curved lid's outline and the latch's recognizable shape. Consider whether small wood grooves need geometry at all, or whether restrained surface color can communicate them at the intended distance. Remove details because they do not serve the asset, not because a low number makes a better headline.
Geometry is only one cost. Large textures, unnecessary material slots, transparency, and the number of visible instances can also matter. Keep a consistent test scene so that a change to one asset does not get confused with a change in lighting or camera position. Any example budget you choose is a project constraint, not a universal standard for every engine and device.
6. Simplify carefully in Blender, or rebuild a simpler shape
Blender's Decimate modifier is one option for reducing a dense mesh. Work on a duplicate and make a modest reduction first. In Collapse mode, the Ratio controls the retained geometry; Blender's documentation notes that triangle-based calculations can make the displayed face result differ from a simple ratio of the original polygon count. Read the resulting statistics rather than guessing the final budget.
After each reduction, compare the chest at the same camera angle and the same gameplay distance. Watch the lid's arc, the latch, and the outer corners. Inspect the back as well as the front. Stop reducing when the damage becomes more important than the saving. A modifier cannot decide which feature carries the identity of your prop.
Sometimes rebuilding is cleaner than repeatedly simplifying. A chest with a blocky body and a restrained curved lid may be easier to reconstruct from a few deliberate forms. Blockbench is a low-poly editor with mesh and texturing tools and can be worth evaluating for a manually authored alternative. Check the chosen project type and export support before committing; do not assume every editor preserves every imported material or animation feature.
7. Review materials and shading independently of geometry
A simplified mesh can keep its outline while losing a convincing surface. Inspect the boundary between wood and metal, the latch edges, and any texture seams. Use ordinary scene lighting as well as the attractive presentation light. A roughness or normal-map problem may be hard to notice in one setup and obvious in another.
Compare the chest with neighboring props. If every nearby object uses broad color blocks, a highly detailed wood texture may look out of place even when it loads correctly. Match the project's visual language before adding extra detail. A deliberate faceted style also needs intentional shading; making every face smooth is not automatically an improvement.
If you replace or rebuild the mesh, confirm that its surface mapping still works. Do not assume a texture will remain correctly aligned after a different geometry workflow. Keep the editable project, the source images you have rights to use, and the final export together. A usable handoff should explain what a teammate needs to open and adjust the prop without reconstructing your decisions.
8. Export GLB and test the actual destination
A completed Modzi3D generation can provide a GLB download. For the Godot example, GLB is a sensible starting point: Godot's documentation recommends glTF 2.0 and supports its binary GLB form. Import the exported file into a small project and inspect the resulting scene rather than assuming that an editor preview is the final deliverable.
Check orientation, size, ground contact, and materials. Place a familiar reference object beside the chest so that a scale error is obvious. View it with your game's camera rather than only an orbiting inspection camera. Add the collision your gameplay requires and test movement around the prop; a visible mesh and usable collision are separate concerns.
Keep OBJ and STL for tasks that actually need them. Changing a file extension or converting a container is not an optimization pass. Godot documents limitations in its OBJ workflow, including missing support for several scene and material features. For this exercise, keep the original GLB and only make a separate conversion when the next tool requires one. Review Modzi3D's displayed conversion cost before submitting that additional operation.
9. Run a repeatable acceptance test
Create a test arrangement with the chest beside a wall, a floor, and a scale reference. Save one camera position for the normal gameplay view and another for inspection. If your game repeats the prop, include a representative number of copies. Do not call the asset optimized because a single copy looks responsive in an otherwise empty project.
Record whether the silhouette reads correctly, whether the latch remains visible, whether materials appear as intended, and whether the base touches the floor. Check collision and lighting separately. Then compare the original and revised versions under identical conditions. If you measure rendering performance, record the hardware, resolution, scene, and test method alongside the result.
A practical handoff note might say: static closed chest; visual review passed at the saved gameplay camera; collision tested at the room entrance; source mesh retained; material adjustment still required under the outdoor light. That note is more actionable than a generic “game-ready” label. It also makes remaining work visible instead of hiding it behind an attractive render.
Common questions before you build a prop library
Can one reference guarantee the exact hidden side? No. Image-based generation estimates surfaces outside the picture. If hinge placement or an accurate back panel matters to the design, supply that information through an appropriate modeling or capture workflow and verify it yourself.
Does a smaller file prove better engine performance? No. Stored file size, loaded resources, geometry, materials, and runtime behavior are different measurements. Test the asset in the intended scene before drawing a performance conclusion.
Is automatic simplification enough for every asset? No. A static chest and an animated character have different requirements. Our example deliberately avoids deformation, moving lids, and complex mechanical construction. An object that bends or opens needs additional structural decisions beyond the static-prop checks in this guide.
Where should you begin? Choose one original prop with a clear silhouette, prepare one reference, and write its intended use down. Try the Modzi3D studio, inspect the output, and keep a record of what you changed. Build a small reliable workflow before generating a large library of assets that all need the same repair.
Further reading
Blender manual: Decimate modifierGodot documentation: available 3D formatsKhronos: glTF asset delivery formatBlockbench: low-poly modeling and texturing toolsGive your idea a starting point.
Create an account to generate from your reference, or explore the example gallery before you start.
Explore the studio